Author Topic: Restoring Sunn 215B Cab  (Read 15868 times)

0 Members and 1 Guest are viewing this topic.

Offline rot gut

  • Sr. Member
  • ****
  • Posts: 135
Re: Restoring Sunn 215B Cab
« Reply #14 on: February 15, 2011, 04:53:10 pm »
The white strip just below the sunn badge or the interior?

When I'm fixing up a cab I fix up everything that doesn't work, so if it works keep it.

Offline ZiggyDude

  • Full Member
  • ***
  • Posts: 40
Re: Restoring Sunn 215B Cab
« Reply #15 on: February 15, 2011, 05:43:03 pm »
This would be the wood that the speakers are mounted on and visible through the grill cloth.   It needs repainted after repairs.
Thanx

Ziggy.

Offline ZiggyDude

  • Full Member
  • ***
  • Posts: 40
Re: Restoring Sunn 215B Cab
« Reply #16 on: February 15, 2011, 09:04:56 pm »
Step 3

 OK so now I have an open area.  But I also have quarter inch holes through the speaker body.  So, we do some measuring (like 3 times over to prevent the “Measure once cut twice” thing).  So out comes the miter box and the slow but accurate hack saw.  “Rir-un-rir-un-rir-un-rir…”  Ugh.  But I do get results.  In each case I pour mega wood glue into the hole and then drive a round wood dowel into it.  This has to be pushed so that it is under the flush line of the cab.  A punch helped.  For the first one this was a lot of work!


  I got better with time and finished the other three – oh that felt good.  Finally I get the 16 holes plugged but you can see there is still a lot of damage to the old tolex and wood.  Mostly parts of loose tendrils popping up and looking mangy.


The next step was to trim that.  This required a variety of tools.  The Dremel was good for removing lots of bulk (Still on a miniature level) while the X-Acto blade did a lot of work,  If I could only have one tool – it would be the blade – but never far from the sharpening stone that kept it quite deadly.  I even tried a chisel.  So now what?  We got an ugly bottom and lots of torn stuff.  Once again the Dremel and blade came out for that.  In time the blade was the best tool.  In the end all was flat and trim and read to go. 

Eventually the wood glue dried and the next step.  I spent a huge amount of time with bright lights and magnifying glasses to trim the crap about each plugged hole.  Then it was time to fix the loss of the tolex.  The can of instant rubber glue was great for this.  It is made for dipping things and getting rubberized handles and such.  I cut some more off my piece of round ¼ inch stick to stir it.  Hey – after all – you never know when you are going to need a rubber coated stick :-  ) After much work the bottom of the box looks like this.


Well, I guess that I should have taken a picture after I washed things up, but I did not.  However, you saw the cleaned up pic earlier before the rubberizing.  A close inspection would of course show what happened – but from a distance it was invisible.  Hey – this is just for the bottom of the cab!

So, things are looking pretty good down below.  I then go over the tolex of the rest of the cab with the liquid rubber.  It dries to the same color and gloss of the tolex and blends in.  This way the little pulls and scrapes of the amp are touched up.  Not sure how to shoot pics of that – but later I will get it in.

Now the real pain.  Waves and waves of unending pain.  Getting that !@#$%^ insulation out.  Not just the insulation but all the glue, nails, and staples that some “Well Meaning” person put in.  I have gone through this before with the 406.  I remember the “Snoopy Saying” of “Curse You Red Barron”.  I pull some of the fluffy insulation out and later notice my finger feels like it got cut – but I can see no cut.  OK – rubber gloves time. 


Curse You Red Barron


A variety of tools were required.  Curse You Red Barron!


Eventually I got all of the crap out.  The kitchen size garbage bag that I put this stuff and only this stuff into.  I can promise you I did not “Fluff” the bag to look bigger.  CURSE YOU RED BARRON!!!


I was hurrying as I needed to gig the amp that night.  We are in no way even close to being done – but I have to get it operational for now.  I don’t want the five ugly screw heads on the face plate to show - so a piece of white plastic bandage tape does nicely for now to hide them.

Offline HRobert

  • Sr. Member
  • ****
  • Posts: 345
Re: Restoring Sunn 215B Cab
« Reply #17 on: February 16, 2011, 06:27:55 am »
You did help!!!!!!!!!!!!!!

 Also - I think that the feet on the castor side I have are original from the pics I found.  Rather large and do not have a steel insert inside.

Zig, Those are the original rubber feet.  A lot of the Sunn equipment from the 70's came with those tound trapazoid profile feet.  I bought some extras back then and think that I still have 3 or maybe 4 somewhere in my parts bin.

Offline ZiggyDude

  • Full Member
  • ***
  • Posts: 40
Re: Restoring Sunn 215B Cab
« Reply #18 on: February 19, 2011, 10:30:06 pm »
OK – time to get ready to roll off and rock.  Err – Rock n Roll.  Well to do that I need wheels.  Here we go!  The Ernie Ball (EBMM) wheels sets pop into vintage Acoustic, Ampeg, and now Sunn stuff.  Works just great.  There is a slight difference in the play regarding when the restraining ring grabs – but not a big deal.  Actually – I was quite tempted to pop in the EBMM female retainers.  They are so shiny-shiny.  It would make the cab glisten in a way.  But in a very small way be less “Correct”.  If I was restoring a car I would put on an aftermarket shiny bumper if the old chrome was bad.  So – what to do here?  Feel free to vote.  By the way – the pic does not do justice – the EBMM look like a mirror and the old are gray.

Kinda cool that the EBMM box uses the Sunn red and black!!!


Now to put the grill back on.  The inside of the thing changed color after I vacuumed it!


Then the next issue popped up.  It looked like the grill was warped.


But it turns out that it was cracked and someone was a really bad shot at trying to staple it back together.  This will be a job for later.  Right now I need to get gigging.  I pop the grill on and load the expectant cab into the truck and its long awaited debut.  Curse You Red Barron…


OK – I’m done.  I was about to do other stuff but Mr. Clock said no.  (Curse You Mr. Clock!)  Pack F-150, drive, arrive, unload, and Roll (no Rockin’) into club.  A back up 370 as the primary was just out of the repair shop and though a talented fellow, he was not “Acoustic Experienced” (another story – very dread, very dread).  At 45 pounds each that is weight to carry.  So, they get a ride on the cab.  Like, I like me new wheel deal thingies - like!  Yippee!!  OK – that was nice.  Like wow, that is happening.  (Too much 80s yet? – Nah!)


We gig - guitars for this night - I chose a random but "test" selection for da cab.


Sorry for any blurry pics - but this whole thing was shot from the camera phone on my BugDroid.  Odd that it was more fuzzy at the end of the night.  Curse you Mr. BugDroid!!

OK – after this it gets more tedious (though fun).  Plus I am a week behind with this and it is like after 12:30 tonight – so I just gotta quit.  Tons of pics shot and stuff done but editing and words not ready to post.  It may surprise one – but this takes work – especially when chasing a 3 year old.  (Why did they have to have such quick feet and hands?  Someone needs revisit the design blueprint on this one :->  )  I hope that at least a few have found this ride fun so far.  Very few post backs.

Anyway - I wish best to all.

- Ziggy -
« Last Edit: February 22, 2011, 09:01:28 pm by ZiggyDude »

Offline rot gut

  • Sr. Member
  • ****
  • Posts: 135
Re: Restoring Sunn 215B Cab
« Reply #19 on: February 20, 2011, 09:42:50 am »
how much did that mockingbird cost you?

Offline ZiggyDude

  • Full Member
  • ***
  • Posts: 40
Re: Restoring Sunn 215B Cab
« Reply #20 on: February 20, 2011, 01:22:33 pm »
Not near as much as the Alembic Rogue sitting in the other guitar stand :-)  The Mock is a 1984, seen more gigs on the Jersey circuit and now here in PA with me.  I found it 9 or 10 years ago hanging on the rack of this store in North Jersey that was old when I was a kid.  They never did the Internet thing and have a bunch of really cool stuff.  Anyway, the Mock was on the wall in used condition.  There is a story behind it, but to cut to the quick now it is my best sounding bass.  If you hear the band on a recording you kow if the Mock was there.  Band mates love it.  

I went on queste a quest to find a 5 string that sounded like it.  Nothing did.  I eventually found out that a guy named Neal Moser was with BC Rich way back and designed the electrics and a lot of the other stuff BC did (like the Bich body shape).  Neal has been in the business forever - been to like 38 NAMM shows.  So, to get a 5 string with the sound of the Mock I went to "The Creator".  We worked out all the details to replicate the tone.  I finally got it last year - of course UPS broke it and I had to send it back.  Here is a link to it - curious what you think...

http://www.talkbass.com/forum/f8/i-just-got-my-moser-spawn-5-a-646652/
« Last Edit: March 06, 2011, 09:12:13 pm by ZiggyDude »

Offline rot gut

  • Sr. Member
  • ****
  • Posts: 135
Re: Restoring Sunn 215B Cab
« Reply #21 on: February 20, 2011, 01:50:55 pm »
I know Neal quite well and am good friends with him, I had/have a basses made by him, nicest guy on Earth. I remember seeing that 5 string spawn in person, it's a shame UPS eff'ed it up.
« Last Edit: October 05, 2016, 05:14:20 pm by loudthud »

Offline ZiggyDude

  • Full Member
  • ***
  • Posts: 40
Re: Restoring Sunn 215B Cab
« Reply #22 on: February 20, 2011, 09:45:09 pm »
Yeah - he mentioned that a few guys were in for what is now 2 NAMM shows ago - and picked up their stuff while in the area - tried it out.  A little weird that I was not the first guy to play it - but overall just as well.  You guys all know the girl you lost :-)

The neck was a "twit" wider than I planned - but better than a "twit" slimmer.  Overall a piece of art.  Nobody knows what it is like to own a guitar until a master craftsmen makes one to fit your own hand and mind.  I am truly happy that Neal and I hooked up.  He is one of the people that created what we all know now.  There should be a Hall of Fame somewhere.  

But - we stray from the subject at hand.  At present i am working on copious measurements of the cab to build a "Blue Print" and also have the numbers to calcualte all that weird stuff they need to know to match speakers in todays complex world.  When I get that done I will post it to the forum as a "Draft" and we can all chime in until all are sure it is right.  Then we have a new thing for the Sunn library.

Next post is what I did after the first gig - after all - the lovely young thing was far from fixed yet!
« Last Edit: February 20, 2011, 10:54:37 pm by ZiggyDude »

Offline ZiggyDude

  • Full Member
  • ***
  • Posts: 40
Re: Restoring Sunn 215B Cab
« Reply #23 on: February 21, 2011, 08:11:02 pm »
OK - Forget - is this chapter 4 or 5?  

At the club the grill is flopping about on the corner since the plastic “Velcro like” piece is missing.  The old “Wedge It with a Piece of Bar Coaster” trick worked great.  Sadly no gig shots – that would have been nice.  Lending out a camera phone never works – don’t even try now
The job went well.  People had fun and so did the Ziggy.  The club was a place that requires you to be on the quiet side.  On top of that the room has an odd shape and some areas along the right side get a lot of bass while the rest of the room is fairly even with less.  You would never know unless you have a wireless.  (If you get compulsive on tone – a wireless is required)  It did explain customer comments (too quiet or too loud).  So – how did it sound?  Great if I was standing next to it.  A quick summary is that there was a mid range presence that was evenly dispersed across the room in both tone and volume.  But the low end quake was limited to only in certain areas.  Despite the massive port this was not an earthquake machine.  On the other hand it moved enough air that I could be at a reasonable volume on stage and be heard anywhere across the room.  Part of this is the tuning of the cab – which some feel is about 60 HZ, maybe down to 45.  The tone may not be perfect but I was heard.  So, you need to decide how many people can tell the difference.

But this is just one room and that alone a test does not make.  I have plans to try this a few more times.  The vintage speaker is only rated at 100 watts and was at its limit and edged farting.  Considering this is a quiet room I need something that can get a bit more dominent.  I have no intention of blowing the vintage Sunn speaker so while gigging the cab I will pop something else in.
 
If you have any ideas – there is a speaker thread going at
http://www.talkbass.com/forum/f15/get-eminence-gamma-vs-delta-vs-legend-15s-743350/


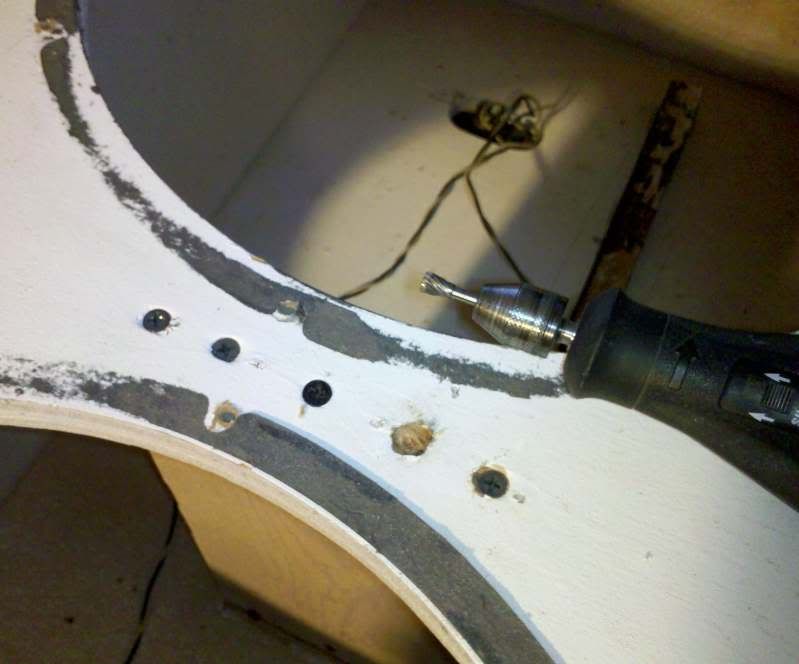
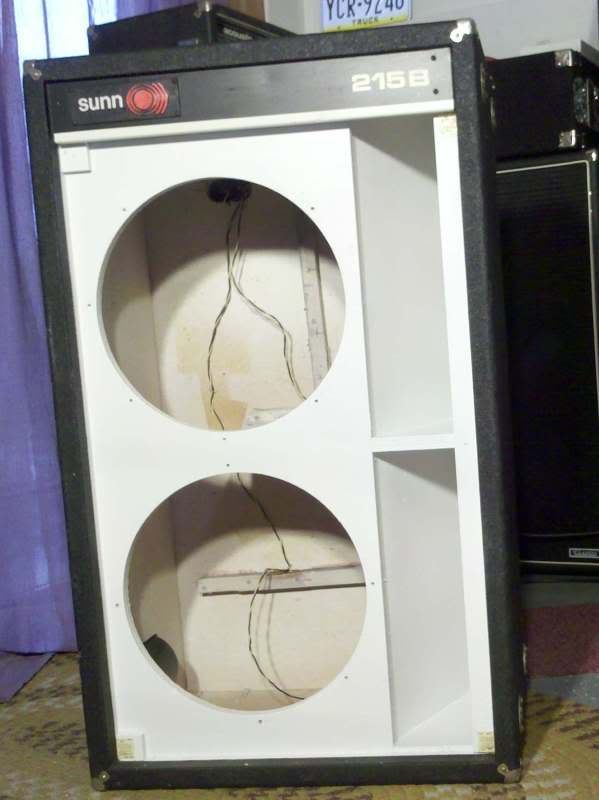
OK – now back to work.  Off comes the grill and out the speakers.  First I attack the 5 ugly screws.  They need to be recessed further so that I can putty over them.  A Dremel with a router bit deepens the holes and the screws then replaced.


The old gaskets are shot and range from gone to full thickness.  They are surely leaking and possibly rattle prone.  Also – ugly and though the speaker covers them I hate just knowing they are there.  


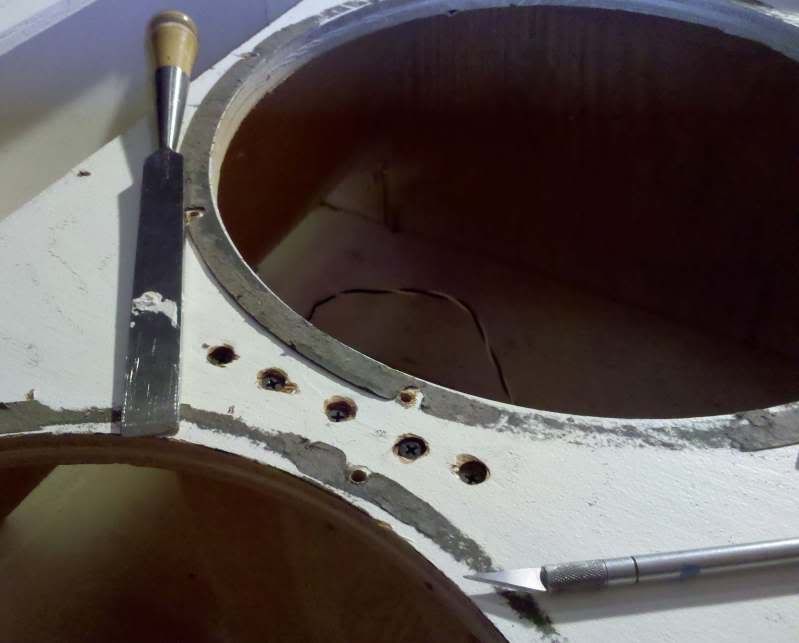
It takes a lot of work to get these things off!  And a mess – I start to wonder if I should have just left them alone.  Leave sleeping doges …  Curse you Mr. Speaker Gaskets!  Eventually after trying chisels and sand paper – the trusty X-Acto blade works the best.  What is interesting is that traces remain.  This is because residual parts of the gasket filled sunken areas in the wood and helped smooth it all out.


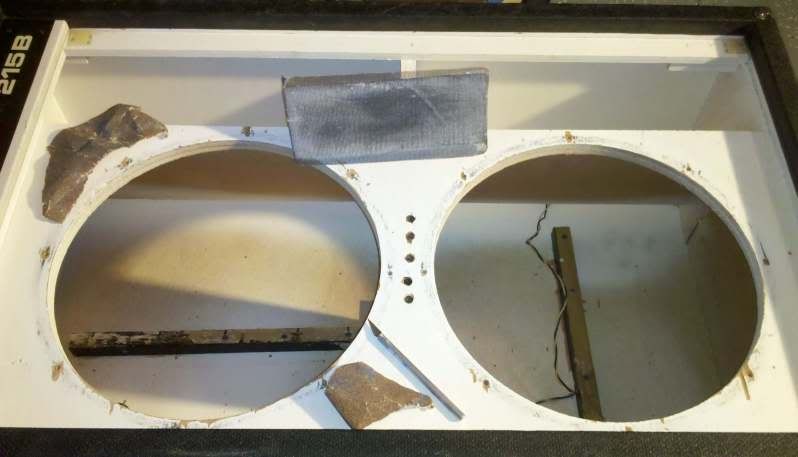
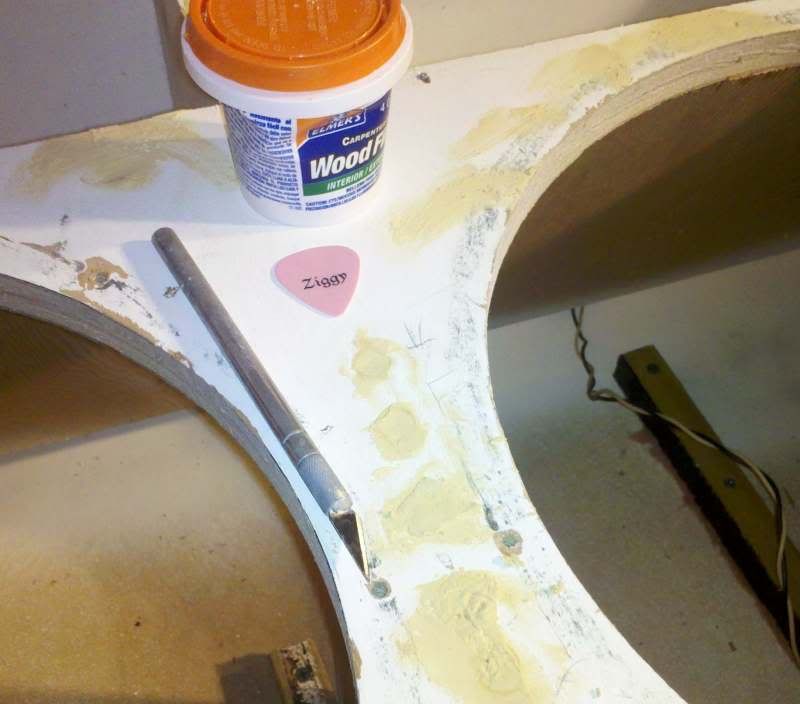
Now to fill the holes – I tried a couple of types of putty and this stuff worked best.  Very fast drying and really easy to sand.  I also go after little dents, some ripped up wood, holes from the staple gun that put this together.  I found that both the X-Acto blade and a stiff guitar pick do well in forming the stuff.  OK – also a shameless plug :-)


All sanded down and ready for the paint.  The cab was originally sprayed and that of course has a different look and feel from brushed paint.  So, I decide to go the spray route.  This was a bit scary as there is the oil over latex or latex over oil based thing going.  A search of a really good primer (can pictured) was the answer.  I used less than half a can and I really hosed it up good.   Needless the say I wanted to do no harm.  I taped over all the internal parts and wires.  Plastic bagged the long wires.  Painter taped that cab from every angle.  And now – we have “The Mummy” of bass cabs.


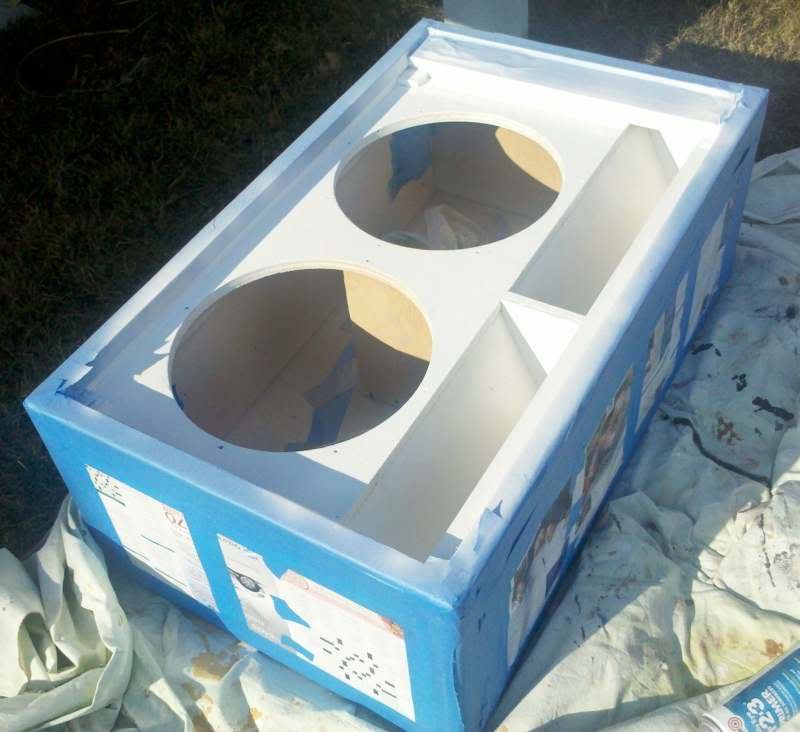
It was an odd day – the Bass Gods smiled upon me and granted 70 degree weather in February so I could paint outside.  Carried the cab out (light w/o speakers!) and set to work.  Of course that was when the 50 MPH winds expected that night to bring in the coming cold front started.  My spray can becomes increasingly disobedient.  Curse You Mr. Wind!!!!!!

The primer dries in 15 minutes and I take it to the garage to finish with the overcoat.  A couple of days later I pull off the half a roll of tape used and – here she is!!


OK - sorry that is all for now.  I am currently caught up in a speaker thing.  Also some soul searching on which feet to use.  After all - why risk pristine vintage parts to the rigors of club stuff.  That just aint right.

Oh - by the way - word of warning.  If you painter tape over the white lettering of the Sunn cab - cover it with paper first.  The painters tape removed just a hint of white paint.  Not enough to do damage - but it did adhere.  The red seemed OK - but may as well cover that to.  My lesson learned and future advice to you!!!

Best to all,

- Ziggy -

« Last Edit: February 21, 2011, 08:19:45 pm by ZiggyDude »

Offline Walt-Dogg

  • Hero Member
  • *****
  • Posts: 567
Re: Restoring Sunn 215B Cab
« Reply #24 on: February 24, 2011, 01:23:27 pm »
Ziggy I wouldn't be able to convince you to trade/sell me one of those 370s?
Gibson Les Paul Special
Electra X260
Squier Precision Bass MIJ
Science Hellhawk 100w
Ampeg VT-22/V-4
Science Mother
Mojotone Bluesbreaker 2x12
Mojotone British 4x12
Ampeg SVT 810

Offline ZiggyDude

  • Full Member
  • ***
  • Posts: 40
Re: Restoring Sunn 215B Cab
« Reply #25 on: February 27, 2011, 07:34:21 pm »
Ziggy I wouldn't be able to convince you to trade/sell me one of those 370s?

I do have some stuff for sale and trade.  As always it matters what for what.  Here is a sampling of the heads.  (Trivia points - which one is the most rare?)


I am not sure how to ship the Cascade Kustom - it is all but mint.  The pic turned the Acoustic blue to gray and the Kuston green to blue.  Go figure....  Curse You Mr. Color Demon!!

Walt - I will get back to you on more details.

Offline ZiggyDude

  • Full Member
  • ***
  • Posts: 40
Re: Restoring Sunn 215B Cab
« Reply #26 on: February 27, 2011, 09:22:07 pm »
Hello – well here we go again.  It was a really hectic week.  Work and also the daily life stuff.  Worked late two nights as someone’s server setup was blowing my code in production – at night of course.  Yup , I know, it is tough all over for everyone else to.

So, I did the limit for the next gig.  Sorry.

The first step was the grill.  I will post a couple of older pics just to refresh the memories.  Basically – the old grill was cracked and the cause seemed to be a demonic staple gun (You guessed it!  – “Curse You Mr. Demonic Staple Gun!!”)  The wood for the grill is hewn from a single piece of plywood.  Like – cut out a really large donut hole.  I guess they had a use for the wood elsewhere.   Maybe the combos or something – maybe the boss wanted a coffee table.  Well – I have restrung grill cloth from scratch before (the Acoustic 406 grill is a redo) and I was not going to just do it again.  So a repair comes first.  I guess this is my first short cut?  I actually feel kinda bad about that.  But – not bad enough :->   After carefully measuring I determined that the grill was suspended from the wood by about 3/8” over much the cab.  That was enough room for a brace.  So I try glue and steel.  (Trivia points – what 80’s movie was driven by the search for “The Secret of Steel”?).  It still won’t be right as I am missing part of the plastic Velcro like (not “Like”) speaker holder snap thingie on one corner.  But we are approaching squareness for the cab parts now.  In wood working – squareness is goodness.


So we pry the stuff out and hope it will not self destruct something.  I am actually pretty worried.  Why the heck did some guy deploy the Demonic Staple Gun?  There must have been some reason.  Unless he was totally buzzed or something.  But even then it seems like a lot of work to pry off a grill just to shoot a few staple.


I try a few ways to get glue into the deep crack.  The injection method was OK (water plus glue) – but once again spackling with e A-Acto blade did the best.  If you ever do this type of thing – make sure you have an X-Acto #1 blade.


So now we add the real deal.  I was careful to drill holes first before putting the screws in .  They are self tapping but I don’t trust the wood.  It was really soft.  I suspect this thing lived in a moist place for some time.  I actually had to back out the screws and add wood glue inside and redo the drill.  The material was just coming soft.  I don’t think it was the fault of Sunn so much as an abused childhood before the thing got to me.   But it avoids making a plywood donut hole.   Please note that the screws are not all the way flush with the metal.  The wood would not allow the extra torque.  I really hope I don’ have to come back here.


We  pop the grill on and mucho better.  After I get the plastic grill holder what you call it thingie inside I should be square.  Square is goo.  Yeah – we been there.


OK – off to the gig.  This is actually an odd room.  They made a basement  into a club.  We are talking bass player doom and glee all in one.  Hard walls, tiled floors, but also an odd shape.   Not a place for extreme volume but you can get loud enough for fun (then stop).  Since the place is so hard (surfaced) I actually have seen a little 1x15 or 4x10 cabs fill the place.  A place forth small stuff to pretend to be big.  So – it is a place that small amps can roam and fill – though at the resulting loss of granularity in tone is noteworthy if you care.  The big box still wins in this place like always – you just need be really careful with the volume dial.  Big time on that.  Train wreck if you don’t.

Toys for the night.  I had the rhythm intro of “Dr Feel Good” going through my head all day and I could not stop myself – I took the Nikki Sixx bass out tonight.  It photographs lousy.  Stealth paint.

The cab did well – but I was very frustrated at a sudden drop off on the ultra low end.  Also – if I got to aggressive I could still make the speakers fart.    It took more work, but I could do it.  I gotta work on this.

Somehow the camera phone would not take a pic of that black bass!


« Last Edit: March 06, 2011, 09:04:14 pm by ZiggyDude »

Offline ZiggyDude

  • Full Member
  • ***
  • Posts: 40
Re: Restoring Sunn 215B Cab
« Reply #27 on: March 08, 2011, 02:52:47 pm »
Rubber Feet

Well – time to decide what to do about the feet.  The original ones were on the side and whoever put those wheels on removed the bottom ones.  The four feet I have look very nice – almost mint.  One had a bent screw inside from sometime in it’s previous life the cab took a shot while loading.  Actually, I was thinking about removing the side feet just for that reason.  I was not planning to set the cab sideways when I use it.  So, no real need for it.

We all know what happens to the rubber feet on cabs when they are gigged.  They are simply no match for the gravel in parking lots, dragged over floors, bumped, bashed, bounced, whatever.  In fact during the limited use I have had with the cab I could see some very faint impressions from the gravel.  So, the feet come off and go in a carefully labeled parts bag in case the cab ever becomes a museum piece.

So, I have two choices.  The original foot is also pictured.


These are both from Antique Electronics Supply.  I was thinking  that the shorter one would be nice as it will get the cab closer to the ground and help with low end bass response some.  The other foot is a twit taller than the original and a pretty good replacement.  The shorter one could also be put on the side of the cab and not be too much of an obstruction while loading the cab – so that has merit.

Unfortunately the brass ring in the short one is too small for the screws that the other two feet use.  I am not going to drill new holes.  I guess I could plug the existing and then screw in the smaller screws into the same spot.  If anyone later wanted to put the original feet back on it would be easy to enlarge the hole a bit and just put them on.  So, I find myself in that state where you just can’t make a decision.  Take the easy road and put the new big ones on or get into a lot more work.  Just for feet?  Actually – I hear some people are really into feet.  I never understood the obsession personally.  An old story I heard once from a far too shapely lass way back comes to mind - but nobody here would be interested.

To pass the time I instead start on the screw holes for the two speakers.  They are of course wood and a few have stripped out.  I take my time and carefully drip small amounts of wood glue in the holes.  You can’t go too fast or it just drips out the other side.  Just a little at a time and keep working all the holes while the others dry up a bit and get tacky.  As I am working the glue on my cardboard pallet also gets thicker and makes the job easier.


After a couple of days I will repeat the procedure on any holes that look large still.  Also – I will drill out any holes that may looked very much filled.  The glue can actually be stronger than the wood.  So, I will treat them like a fresh install.

Looking back I should have done this before I painted the front with the fresh coat of white.  But I was in a hurry to get the cab gig ready and I did not realize how bad some of the holes are.  And, I have been pulling speakers in and out of this quite a bit lately and that has also loosened up the holes some.

By the way – do NOT put the screws back in while the glue is wet!  At least not if you plan on taking them out someday.  I did that once repairing the guitar strap button on my EB3.  One day I wanted to take the strap off and wound up taking the bass to a machine shop where they sheared off the top of the screw and drilled it out.  Not a pretty site and a real pain in the butt!

Well – after this I have another trip to addressing the tolex.  It looks nice but I would like to make it nicer.  I saw on another refurb thread that someone had used show polish and then an Armor-All like treatment.  The shoe polish caught me off guard.  Has anyone tried this?  What are the pros and cons?

Oh – and I still need decide on them thar feet!!!!!  Curse You Mr. Rubber Foot Demon!
« Last Edit: September 16, 2011, 10:26:02 pm by ZiggyDude »